Saturday, April 22, 2017

Decoding the Ubuntu Releases

Ubuntu is a Linux Operating System flavour which is following a regular and consistent release plan of once in half year major release for almost last 13 years since the time it was first released on October 2004. This kind of a consistency and regularity in release is something even the most famous commercial Operating Systems are failing to follow.


But, this twice a year release plan often confuses about which version to start using for a novice user or even sometimes an intermediate level user who want to adopt Ubuntu. 

For explaining this, I would like to list all the versions (series and milestones) of Ubuntu right now at this moment in support (The current list of it can be referred from the official Launchpad Release Management page of Ubuntu):

·         17.04 “Zesty” series - current 
Milestones: zesty-updates
·         16.10 “Yakkety” series - supported 
Milestones: yakkety-updates
·         16.04 “Xenial” series - supported 
Milestones: xenial-updates, ubuntu-16.04.3, and ubuntu-16.04.2
·         15.04 “Vivid” series - supported 
Milestones: vivid-updates
·         14.04 “Trusty” series - supported 
Milestones: trusty-updates and ubuntu-14.04.5
·         12.04 “Precise” series - supported 
Milestones: precise-updates

The above list is posted just for a reference for the further content in this post. Please don’t try to understand anything from this now (If tried, confusions can be cleared at your own risk 😊).

Understanding Ubuntu Version Number


By the version number of an Ubuntu release, we can understand exactly which year and month it was released. If you take the latest Ubuntu version of 17.04 Zesty Zapus, it was released on April 2017 and the version number can be decoded as below:

Management of Releases


Support Length

Not all the Ubuntu release versions enjoy the same length of support period from the development team. This support period is decided based on the type of the release:

  • Regular releases are supported for 9 months. For example, the current release of 17.04 will be supported till January 2018. Similarly, 16.10 will be supported till July 2017. But, this is not the case of 16.04, which was an LTS release (more details in next point). [Note]: Earlier it was for 2 years and reduced it to 9 months gradually. That is the reason we are seeing 15.04 in the list of supported versions still.
  • Long term support (LTS) releases are for 5 years. 16.04 (released on April 2016 and supported till April 2021) is the latest LTS available in the current support list. LTS releases will be published in a two-year cycle. 12.04 and 14.04 are the other LTS in support now. Support for 12.04 will end by 28thApril 2017 as it completes 5 years by then and 14.04 is supported till April 2019.
  • Older releases may have different support length.

Release Cadence


Releases are published in a time-based fashion, every 6 months, following a planned schedule.


Choose Your Version Now!


Based on the understanding of the versioning of Ubuntu releases, the release cycle and the support lifecycle, Ubuntu version can be chosen, considering the what kind of user you are. I am dividing the users as Novice, Intermediate and Advanced here for easy understanding.


Novice


A basic computer user who uses it for his day to day job for some applications in it, but not that tech savvy to update the system regularly is what I categorized as Novice.
For those people, I will suggest to always install an LTS version which already there in market for at least 1 year. From the current available releases, they can use 16.04 Xenial Xerus.

This helps them to work with a system which is more stable and less risky of bugs and issues. Plus, since it is an LTS, the support ideally continues for 5 years and they can easily continue with the same system non-upgraded for that much period if all the applications they need are working on it.

But, regarding upgrade, my suggestion for them will be upgrade it after a year with the next LTS once it is released. So, for the current scenario, you can think of upgrading it with 18.04 may be in April 2019.

This keeps the system upgraded every 2 year and with less risks.


Intermediate


A tech savvy computer user who want to be with the latest in the market always in his system and aware of troubleshooting a bit of issues if required.

For those people, I will suggest to go with the latest available LTS every time it is published. For now, they can start with 16.04 Xenial Xerus.

There is a bit of risk as you are taking LTS as soon as it is published and there can be issues in it. But, you will get good support from the online communities to solve those issues as the user base will be more compared to the regular releases.

After that they can think of upgrading with 18.04 once it is published in April 2018.
This keeps your system upgraded every 2 year and that too with the latest with a bit of risk about issues popping up.


Advanced


A user who can even program a bit and solve the issues if required is the kind of user I meant by advanced user.

For those people, I will suggest them to take every half yearly release after 3 months of its publishing and currently they can start with 16.10 Yakkety Yak and upgrade to the latest one 17.04 Zesty Zapus maybe 3 months later.

They can be updated with the latest in the system always with this and they can even contribute to the system a bit if possible with their spare time.


Hope this helps to remove your confusions and choose the right version of Ubuntu to start your life with the free open source world of Ubuntu.

Wednesday, April 5, 2017

Visual Studio 2017 Installation Walkthrough

Environment Setup


I tried my round of installation of Visual Studio 2017 with an Enterprise edition of it in a virtual machine running Windows Server 2016 as the operating system.

The installation was carried out using an offline installer of Visual Studio 2017 Enterprise edition (It is of size 23.8 GB if you are downloading a package with all language packs in it). This offline installer was occupied by using the command vs_enterprise.exe --layout c:\vs2017offline ran on VS 2017 Enterprise Online installer EXE (almost of 1 MB in size). For more information of getting offline installer, please refer the Microsoft documentation.

During my installation process, I kept my machine disconnected from internet connection to make sure that the installer was running completely offline itself. A kind of test of the VS 2017 offline installer 😊.

Initial Steps


The installation started with a window to select the components you want to install from Visual Studio and by default all the Workloads are unselected.

Workload and Component Selection Window

In my case I went on and selected all the Workloads available. As you select each of the Workloads, the details of the components selected based on that will be showing up in Summary section on right side.
In Summary section, there will be some components unselected even if you select the containing Workload. You may need to select those separately again from Summary section. Likewise, once you selected all the components of all Workloads, through the Summary section, still there will be few of the components which will not be included in the installation selection. So, now you can go the Individual components tab and select the remaining unselected components as well.
Now, the last thing is that, if you want a different language pack than en-US (English US), then go to the Language packs tab and select it. By these, you are good to go ahead and click the Install button now. You may need around 78 GB of disk space if you selected every single component available in the installer.

Installer Issues


Incredibuid Issue


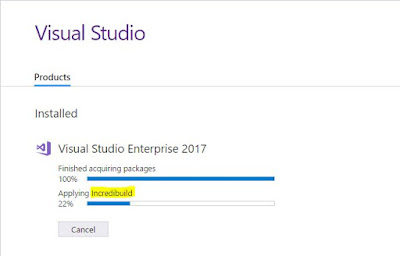
At around 22% completion of the installer, the Incredibuild component was getting installed and it got stuck there for too much time for me (almost a day I left it like that). I saw some discussions of this issue in the developercommunity as well and the solution was not an easy one to apply.

Incredibuild Delay Screen
The solution is that to kill all the tasks in Task Manager with the name Incredibuid (maybe 3 or 4) including the task named Incredibuild_vs2017.exe, which is nothing but the installer EXE of the Incredibuild component.
Just after this, you will find the installer to go forward with the installation of the remaining components. It took almost 7 hours for me to complete with the installation like this (excluding the time I wasted for waiting for Incredibuild installer to finish).
But, since the Incredibuild installation was killed by the user, the installer will show an error message after this 7 hours of installation and I got the following content in the log.

The product failed to install the listed workloads and components due to one or more package failures.

Incomplete workloads
    Desktop development with C++ (Microsoft.VisualStudio.Workload.NativeDesktop,version=15.0.26228.0)
    Game development with C++ (Microsoft.VisualStudio.Workload.NativeGame,version=15.0.26228.0)
    Mobile development with C++ (Microsoft.VisualStudio.Workload.NativeMobile,version=15.0.26228.0)

Incomplete components
    IncrediBuild (Component.Incredibuild,version=15.0.26228.0)

You can search for solutions using the information below, modify your selections for the above workloads and components and retry the installation, or remove the product from your machine.

Following is a collection of individual package failures that led to the incomplete workloads and components above. To search for existing reports of these specific problems, please copy and paste the URL from each package failure into a web browser. If the issue has already been reported, you can find solutions or workarounds there. If the issue has not been reported, you can create a new issue where other people will be able to find solutions or workarounds.

Package 'Incredibuild,version=7.31.1' failed to install.
    Search URL: https://aka.ms/VSSetupErrorReports?q=PackageId=Incredibuild;PackageAction=Install;ReturnCode=1
    Impacted workloads
        Desktop development with C++ (Microsoft.VisualStudio.Workload.NativeDesktop,version=15.0.26228.0)
        Game development with C++ (Microsoft.VisualStudio.Workload.NativeGame,version=15.0.26228.0)
        Mobile development with C++ (Microsoft.VisualStudio.Workload.NativeMobile,version=15.0.26228.0)
    Impacted components
        IncrediBuild (Component.Incredibuild,version=15.0.26228.0)
    Log
        C:\Users\Administrator\AppData\Local\Temp\dd_setup_20170403203042_469_Incredibuild.log
    Details
        Command executed: "C:\ProgramData\Microsoft\VisualStudio\Packages\Incredibuild,version=7.31.1\packages\Incredibuild\Incredibuild_vs2017.exe" /install
        Return code: 1
        Return code details: Incorrect function.

Once you click OK on the error message popup, it will show up with an option to ‘Repair’ as the installation was not successful for Incredibuild. The sad part is that, we have no other way but to repair. Again another 7 hours of window for repair installation. The good thing this time is that Incredibuild installer will pass through without any issue this time.

Android SDK Installation Delay


I saw some developer community discussions mentioning theAndroid NDK installers are getting stuck. But, personally for me, there were no Android NDK installers getting stuck during installation. But, the installation of the Android NDK was taking very much high amount of time compared to other components. Almost 15% of the installation progress was being shown for Android NDK installer (from 75% point of progress bar to 90% point).

On Success


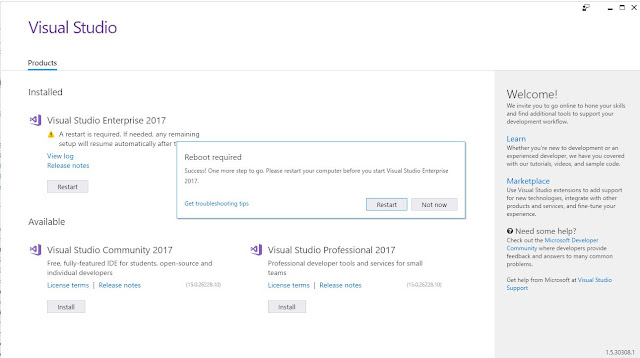
On successful completion of the installation, you will get a window like below asking for a restart of your machine. Once, the restart is done, you are all set to use your Visual Studio 2017.

VS 2017 Installation Success Screen


Wishing you all happy installation and happy coding!!